Distributed AI Systems: A Practical Guide to GPU Compute and Experimental Environments
Reading the Book Without a Cluster? Spin Up a Multi-Node Training Lab for a Few Dollars.
Theory Is Cheap: Why You Must Run Multi-Node Hands-On
Readers of Distributed AI Systems frequently ask a very practical question in my inbox and community discussions:
“I understand the theory behind DDP, cross-node communication topologies, NCCL collectives, and Slurm scheduling. But at work or at home, I do not have a massive multi-GPU cluster. I only have a single GPU or a dual-GPU workstation. I really want to run a genuine cross-node distributed training job (even just two nodes with one card each). Where do I find an affordable environment, and how do I avoid the common networking pitfalls?”
This is one of the most sensible questions an engineer can ask.
In distributed AI systems, single-node experiments (even single-node multi-GPU) hide the messier realities of distributed systems:
-
Conceptual symmetry creates blind spots: On a single dual-GPU box, GPU 0 is both
rank=0andlocal_rank=0, while GPU 1 is bothrank=1andlocal_rank=1. Subtle confusion between global and local ranks goes unnoticed because the numbers happen to coincide; -
Networking collapses into loopback: Single-node training runs over
127.0.0.1or PCIe/NVLink. You never experience real packet latency, cross-node master rendezvous handshakes, dynamic NCCL socket negotiations, or multi-interface binding.
Only when you distribute work across two physically separated nodes (e.g. nnodes=2, nproc_per_node=1) does the true topology reveal itself: both nodes have local device cuda:0 (local_rank=0), but global ranks 0 and 1. Master addressing, rank-gated logging, and collective communication suddenly become real engineering considerations.
This guide is written specifically for readers who lack a dedicated cluster but want hands-on experience running multi-node distributed training.
Here are several of the most practical, reasonably cost-effective distributed training setups available today, along with the platform-level friction that standard pricing tables leave out. Even with a budget of just a few dollars (less than the price of a cup of coffee), you can avoid common pitfalls and run the book's multi-node experiments end-to-end.
Option 1: Emulating Two Nodes on One Dual-GPU Box (Vast.ai Example — Zero Network Hassle)
When first learning distributed training, many engineers instinctively assume: "If I want to run multi-node training, don't I need to find two physical machines and network them together first?"
Not necessarily. In distributed systems engineering, the most effective debugging methodology is always separation of concerns: get the process topology, device ordinals, and control-flow logic working first before tackling physical network complications. Otherwise, if your run hangs, you will have no idea whether your Python code has a logical bug or whether a firewall dropped your packets.
Therefore, the lowest-friction and highest-signal first step is using a single dual-GPU machine to emulate two single-card nodes.
If you do not have a dual-GPU workstation locally, there is no need to purchase expensive hardware or commit to enterprise cloud contracts. The lowest-barrier route is renting a consumer GPU instance on a crowdsourced compute marketplace like Vast.ai.
Here is a critical architectural decision where beginners frequently stumble:
Rent a single "2x GPU" instance; do NOT rent two separate "1x GPU" instances and try to network them together!
Instances on Vast.ai are standalone Docker containers scattered across global data centers and home labs, residing behind complex public NATs. Most container images lack the/dev/net/tunkernel module, making Mesh VPNs like Tailscale or WireGuard fail to establish direct tunnels. Furthermore, PyTorch DDP and NCCL dynamically negotiate high-range ephemeral ports at runtime for collective communication. Vast.ai's static port forwarding cannot cover these dynamic ports, almost guaranteeing an indefinite hang during the very firstall_reduce(backward pass).
The Geek Solution: Rent a single dual-GPU instance, and use environment variables to mask visibility into two virtual single-card nodes!
A dual-GPU instance equipped with 2x RTX 5070Ti or 2x RTX 4090 on Vast.ai typically costs just \$0.20 to \$0.50 per hour (less than half a dollar). It requires no enterprise KYC or manual quota approvals — you can top up a few dollars and spin one up in seconds.
1. Renting a Dual-GPU Instance
Register an account on Vast.ai and configure your SSH public key. Navigate to the search interface:
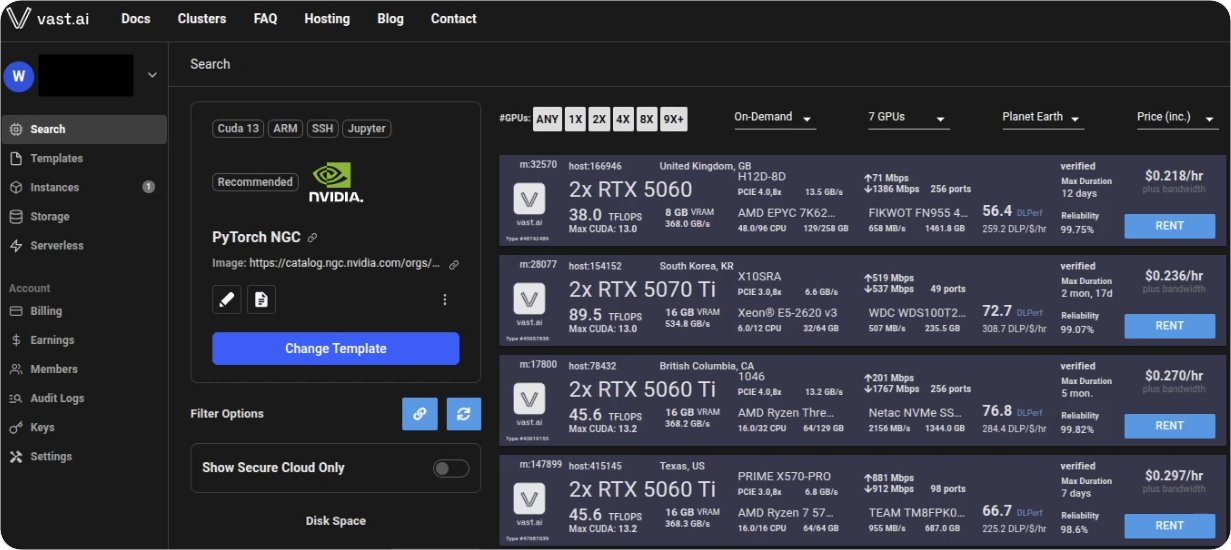
In the search filters:
- GPUs: Select
2X; - Template: Choose the official PyTorch image (with CUDA 13 support).
Find an instance at an attractive price (e.g. $0.27/hr) and click RENT.
Next, click Instances in the left sidebar to watch your instance initialize:
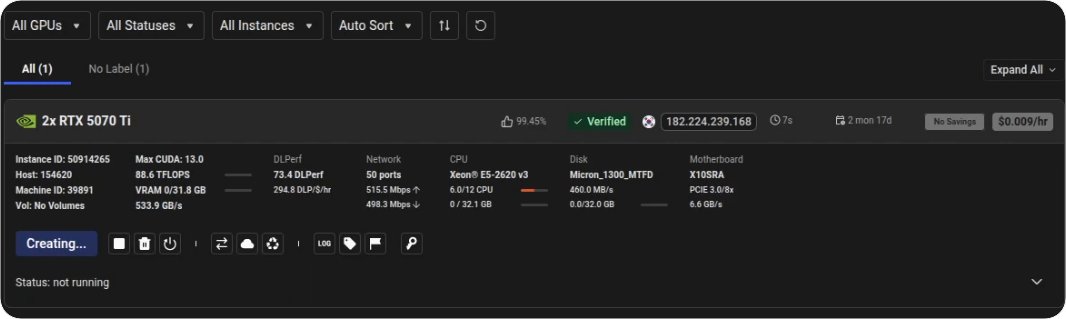
After a couple of minutes, the status will turn to Running, revealing a blue Connect button:
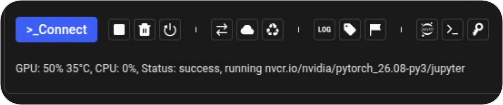
Click the button to reveal your SSH connection command:
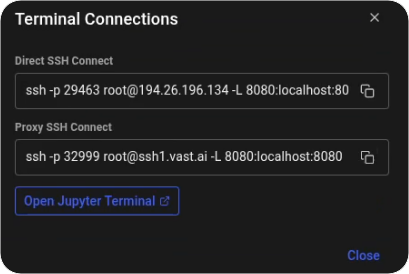
Paste this command into your terminal to SSH directly into the remote GPU node.
2. Cloning Source Code and Splitting Panes with tmux
Once connected via SSH, you will typically find yourself inside a tmux session.
First, clone the companion repository for Distributed AI Systems:
git clone https://github.com/PacktPublishing/Distributed-AI-Systems.git
Vast.ai's official PyTorch image already ships with a CUDA-matched build of torch preinstalled, so install the book's companion package straight into the image's own environment:
pip install distai
Resist the urge to run
python -m venv: a fresh virtualenv isolates itself from the image's site-packages by default, which means torch and the CUDA runtime vanish — andpip install distaiwill not pull back a torch build matched to the instance's driver, so you would be re-downloading several gigabytes for nothing. If you genuinely need an isolated environment, pass--system-site-packages:
bash
python -m venv --system-site-packages .venv && source .venv/bin/activate
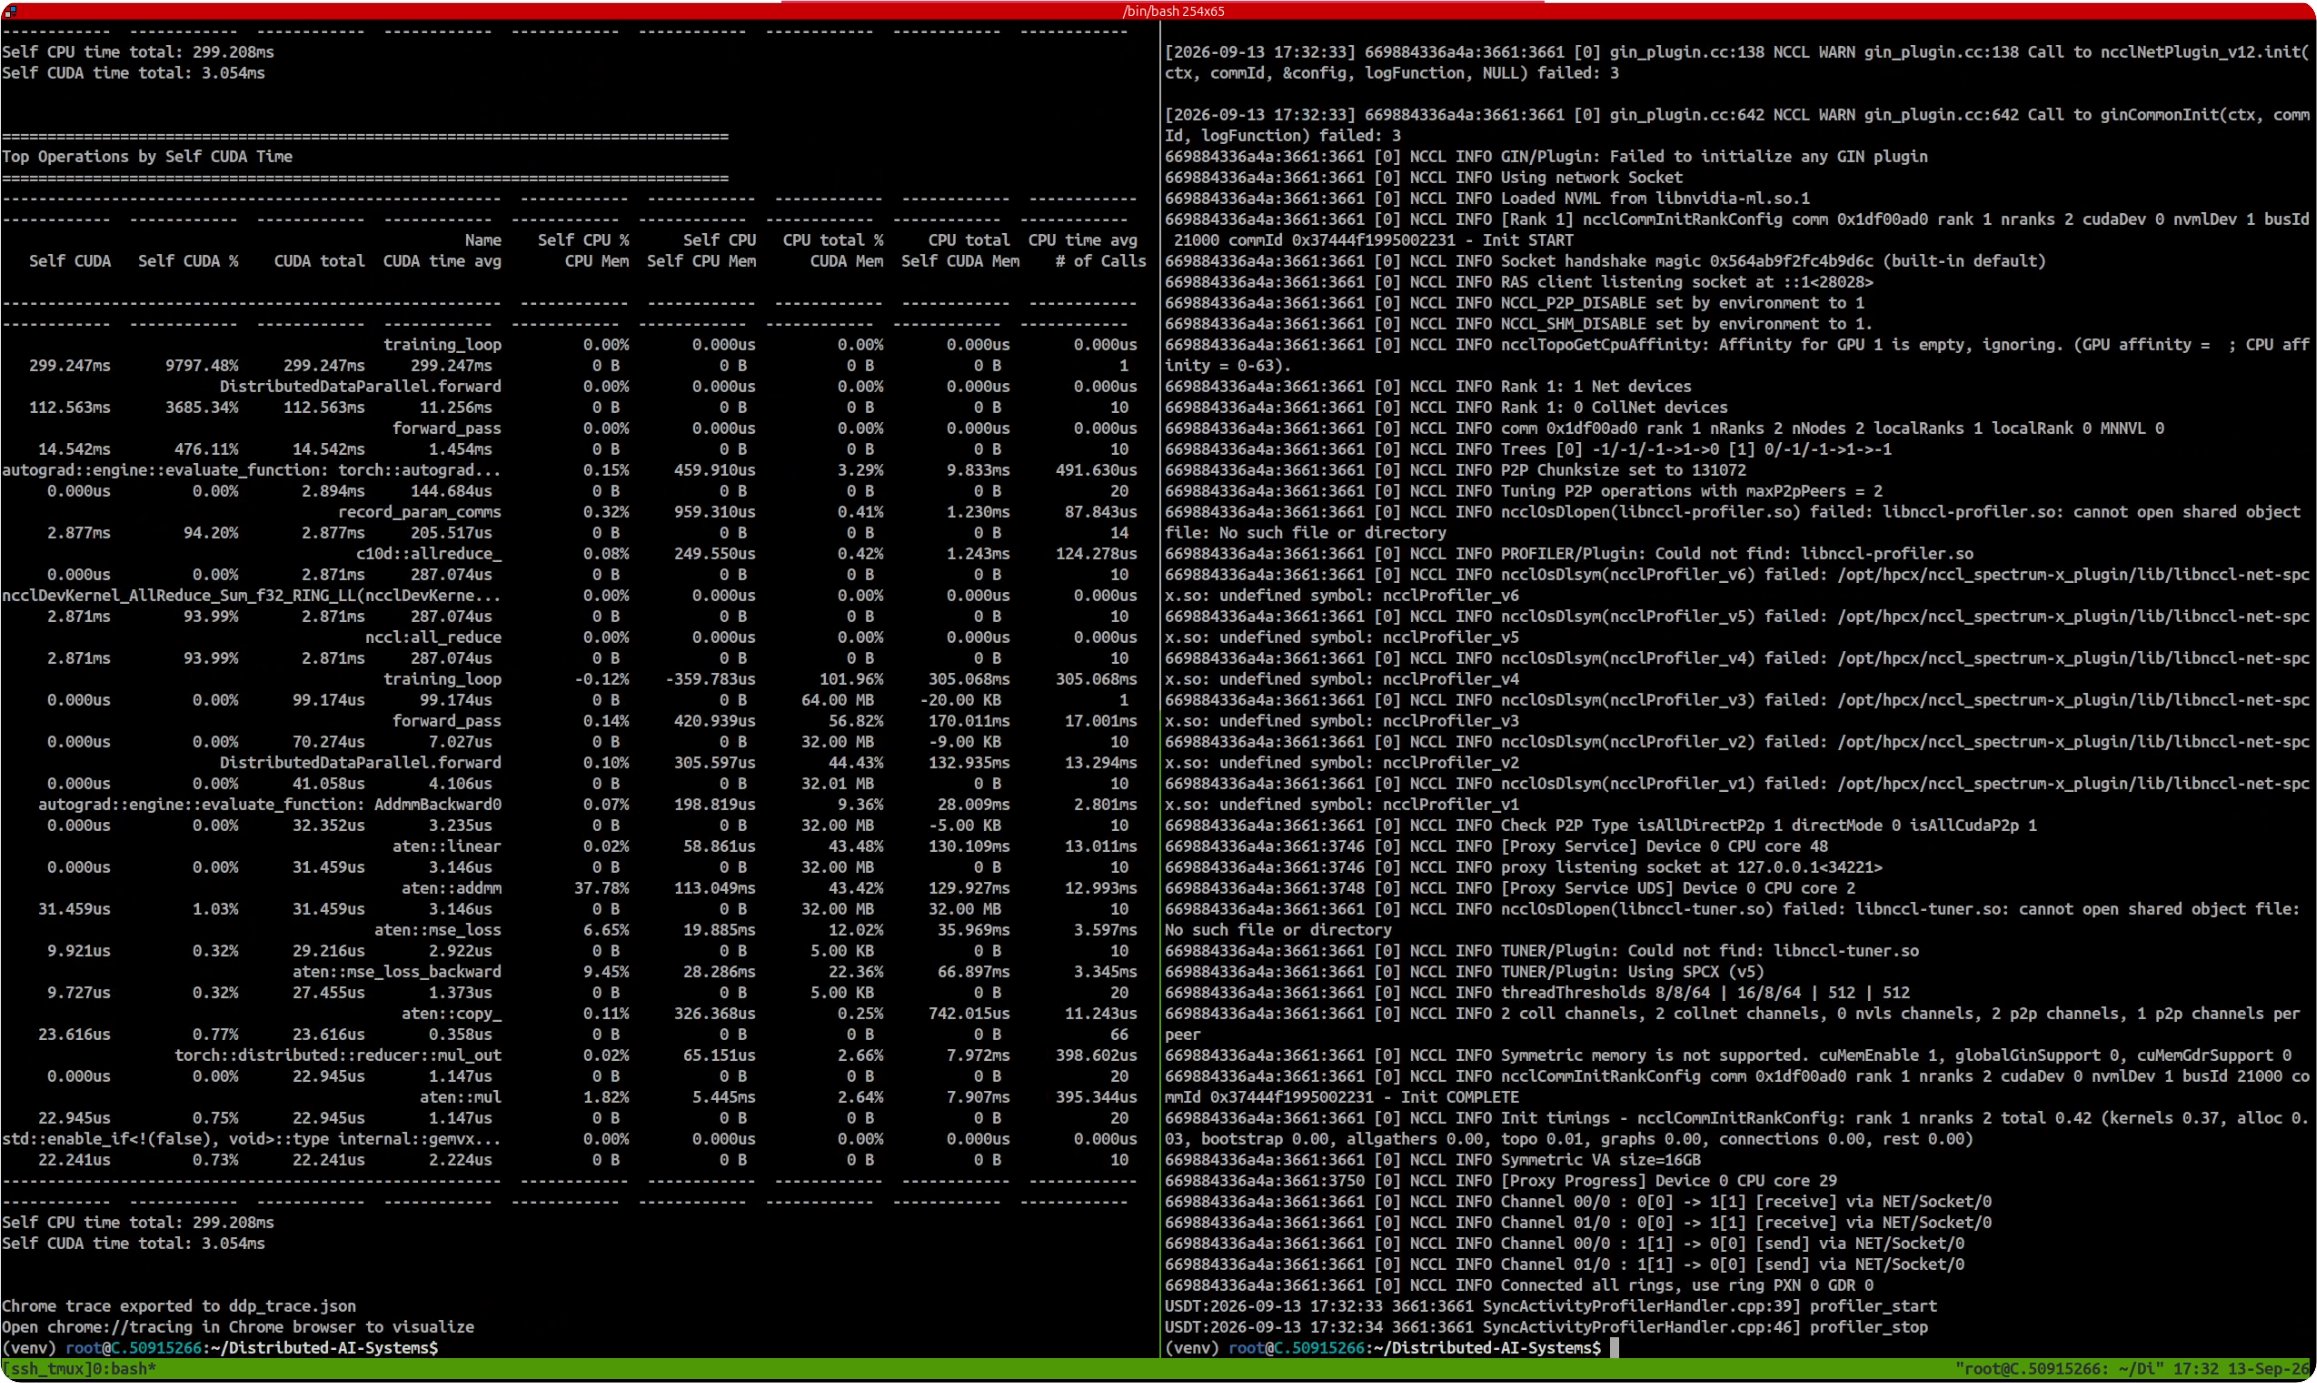
Next, use tmux window splitting to create two side-by-side terminal panes:
-
Vertical split (split into left and right panes):
PressCtrl + b, release, then press%(Shift + 5) -
Horizontal split (split into top and bottom panes):
PressCtrl + b, release, then press"(Shift + ')
Essential tmux shortcuts:
- Switch active pane: Press
Ctrl + b, release, then use the arrow keys (←/→or↑/↓). - Close active pane: Type
exitor pressCtrl + d.
After splitting:
- Terminal 1 (Pane 1): Acts as Node 0 (emulating the first single-GPU node);
- Terminal 2 (Pane 2): Acts as Node 1 (emulating the second single-GPU node).
Example layout:
3. The Core Hack: Launching Training with CUDA_VISIBLE_DEVICES
In each of the two terminal panes, set environment variables to isolate device visibility for each process:
# ==========================================
# Terminal 1 (Node 0: global rank 0, local device 0)
# ==========================================
CUDA_VISIBLE_DEVICES=0 torchrun \
  --nnodes=2 \
  --nproc_per_node=1 \
  --node_rank=0 \
  --master_addr=127.0.0.1 \
  --master_port=29500 \
  chapter3-distributed-training-with-pytorch-ddp/code/profile_ddp.py
# ==========================================
# Terminal 2 (Node 1: global rank 1, local device 0)
# ==========================================
CUDA_VISIBLE_DEVICES=1 torchrun \
  --nnodes=2 \
  --nproc_per_node=1 \
  --node_rank=1 \
  --master_addr=127.0.0.1 \
  --master_port=29500 \
  chapter3-distributed-training-with-pytorch-ddp/code/profile_ddp.py
Why Is This the Most Efficient Way to Learn Multi-Node Logic?
- 100% faithful device topology:
- From the perspective of the Python process in Terminal 2,
CUDA_VISIBLE_DEVICES=1strictly masks device enumeration at the CUDA driver layer. It only sees a single card, whose local device ordinal is guaranteed to be 0! -
The real system state evaluates as:
- Terminal 1 (Node 0): global
RANK = 0, localLOCAL_RANK = 0, accessing devicecuda:0; - Terminal 2 (Node 1): global
RANK = 1, localLOCAL_RANK = 0, accessing devicecuda:0.
- Terminal 1 (Node 0): global
-
Pinpoints common distributed code bugs:
-
If someone mistakenly writes tensor allocation as
data.cuda(rank), Terminal 2 will attempt to locatecuda:1, immediately triggering aninvalid device ordinalcrash. Only writing the properdata.cuda(local_rank)succeeds. -
Zero network friction, instantaneous feedback:
- Rendezvous handshakes route through the local loopback interface (
127.0.0.1). There are zero WAN latency spikes, dropped packets, or NAT roadblocks. You can edit code and re-run within seconds, shrinking your debugging feedback loop to near zero.
Be clear about where this trick stops working. Both processes run on the same physical host, so during topology detection NCCL sees an identical hostname and routes collectives over shared memory and CUDA IPC (P2P) — the network transport layer is never exercised at all. This setup validates device mapping (
rankvs.local_rank) and control flow perfectly, but it cannot surface real network problems: NIC binding across hosts,NCCL_SOCKET_IFNAMEselecting the wrong interface, MTU mismatches, or firewall drops. Those belong to Option 2 below.
Option 2: Advanced Real Multi-Node — Native Cloud VPC Walkthrough (Featuring Oracle Cloud OCI)
Once your code logic, rank mappings, and device ordinals are thoroughly verified in Option 1, you will likely want to experience real physical network latency, cross-node interface binding, and VPC security groups. In that case, running GPU instances inside a native Virtual Private Cloud (VPC) on a major cloud provider is the industry standard.
Introductory tutorials for AWS EC2 and Google Cloud (GCP) are everywhere online, but in practice both present friction: introductory GPU quotas on fresh accounts are notoriously difficult to clear, and budget shapes often have limited VRAM (e.g., T4 has only 16 GB, which quickly runs out of memory for modern LLMs, while 24 GB A10G/L4 shapes carry premium pricing).
By contrast, Oracle Cloud Infrastructure (OCI) has emerged as one of the best-kept secrets for deep learning and distributed systems engineering: a 24 GB NVIDIA A10 GPU paired with 240 GB of system RAM, 24 Gbps networking, and competitive hourly pricing.
Below is a step-by-step walkthrough based on my own live deployment on OCI — from service-limit approval and deciphering warning dialogs, to pricing realities and cross-node network configuration.
1. Requesting GPU Service Limits and Getting Approved
Every brand-new public cloud tenancy starts with its GPU quota set to zero. On OCI, these permissions are managed as Service Limits.
Free-tier accounts cannot launch GPU shapes. You must first link a payment method to upgrade to Pay As You Go (PAYG). Once upgraded, submit an increase request:
- Service: compute
- Limit Name: gpu-a10-count
- Requested Value: 1 (or 2 for multi-card/multi-node testing; starting with 1 has the highest approval rate)
- Reason: Provide a concise and legitimate research justification, such as:
"For PyTorch distributed training and model validation testing"
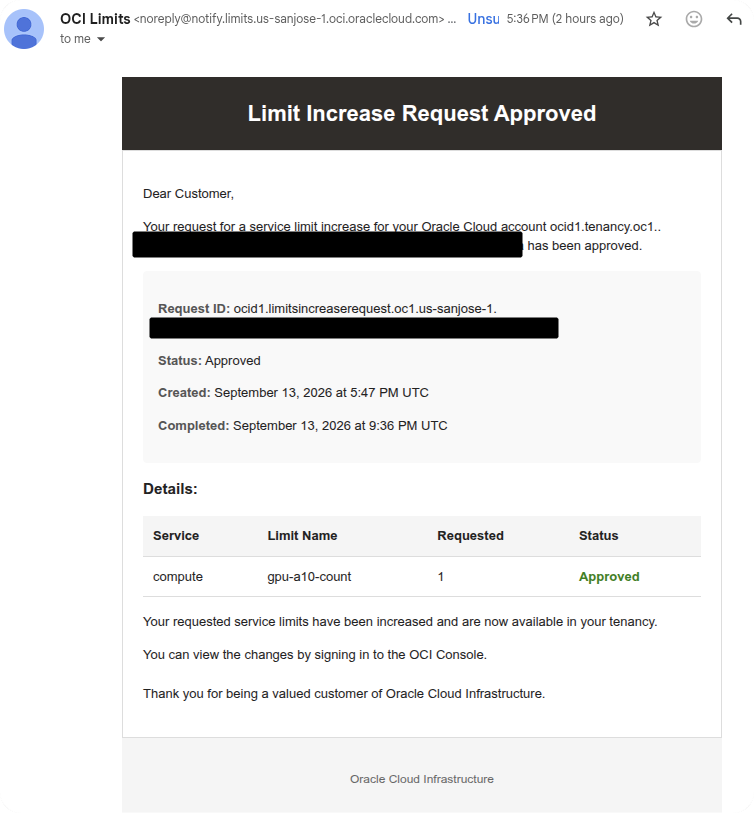
While some cloud providers take days to review GPU requests, OCI's turnaround can be remarkably fast if the request is well-structured. I submitted my request at 5:47 PM UTC, and in less than four hours (9:36 PM UTC that evening), I received the official approval confirmation:
In the OCI Console under Limit increase requests, the request status officially turned green as Approved:
2. Deciphering OCI’s “Critical Warning”: Quota vs. Physical Capacity
After getting approved, when you navigate to the instance creation page, you might be startled by the following warning:
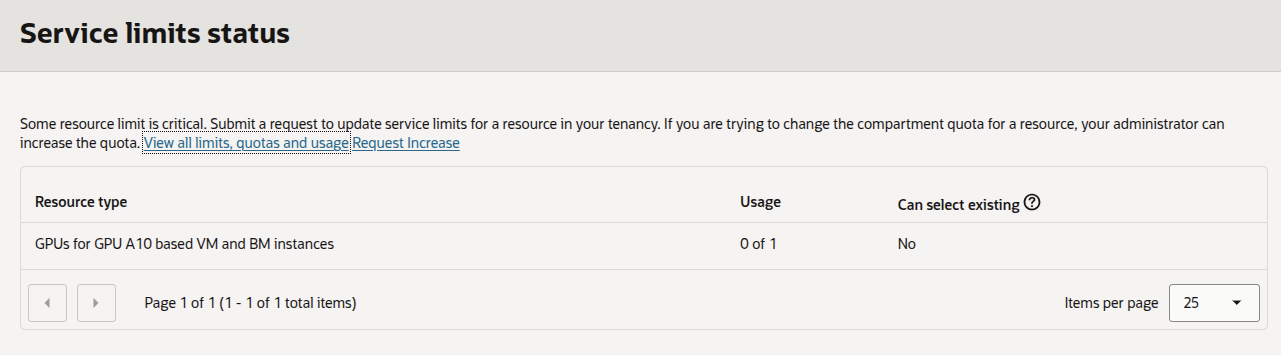
A prominent yellow warning banner reads:
Service limits status — Some resource limit is critical.
GPUs for GPU A10 based VM and BM instances: Usage 0 of 1, Can select existing: No
Does this mean the data center is out of GPUs? Or is the account blocked?
Neither!
- Usage: 0 of 1 explicitly means: you are currently using 0 GPUs, and your limit is 1 GPU — you are fully authorized to provision one 1× A10 instance right now!
- Why does OCI label it critical? Because launching this machine will immediately consume your entire quota (0/1 becomes 1/1, or 100% capacity). OCI's monitoring system automatically flags any resource reaching 100% allocation as "critical."
- "Can select existing: No" simply indicates that there is no existing pre-allocated pool to reuse in this wizard step.
Crucial Engineering Takeaway: Service Limit (Quota) ≠ Physical Capacity
A service limit is your administrative permission ceiling. As long as the final "Create" step does not returnOut of host capacity, physical GPU capacity is available in that availability domain, and you can proceed with confidence.
3. Shape Selection and the Truth About Costs
In the OCI Browse all shapes selector, GPU shapes are located under Specialty and previous generation:
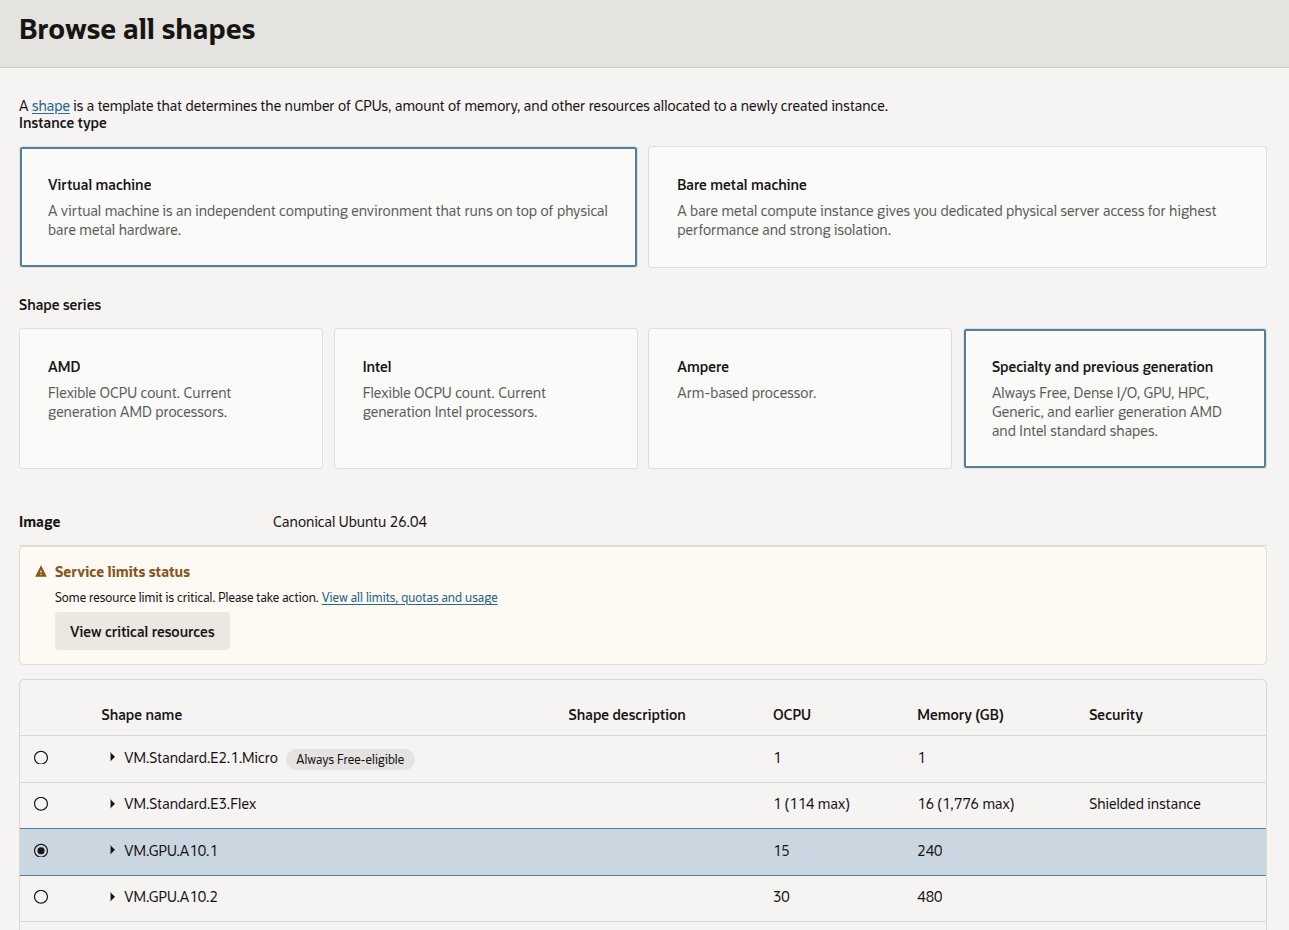
Expanding VM.GPU.A10.1 reveals its specifications:
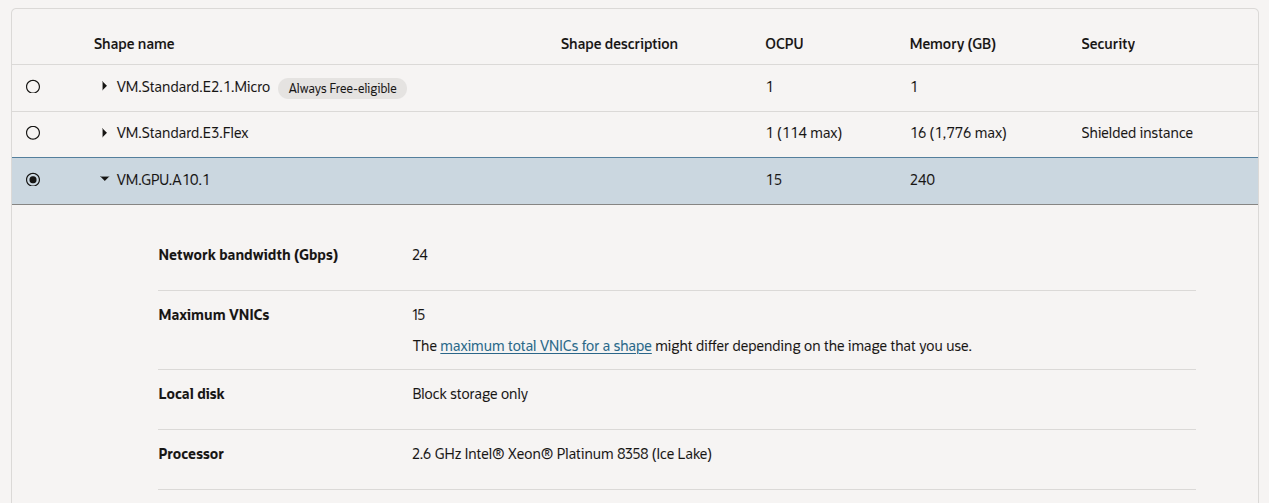
- GPU: 1 × NVIDIA A10 (24 GB dedicated VRAM);
- CPU: 15 OCPU (equivalent to 30 vCPUs, Intel Xeon Platinum 8358 @ 2.6 GHz);
- System Memory: An enormous 240 GB RAM (note: this is host memory, not GPU VRAM, but it provides tremendous headroom for dataset caching, in-memory shuffling, and checkpoint serialization);
- Network Bandwidth: 24 Gbps.
The Pricing Reality: Where the Monthly Estimate Comes From
When you select this shape, the sidebar displays an estimated price:
Estimated total: \$1,490.00 / month (1,488 USD/mo of compute plus 2 USD/mo for the boot volume):
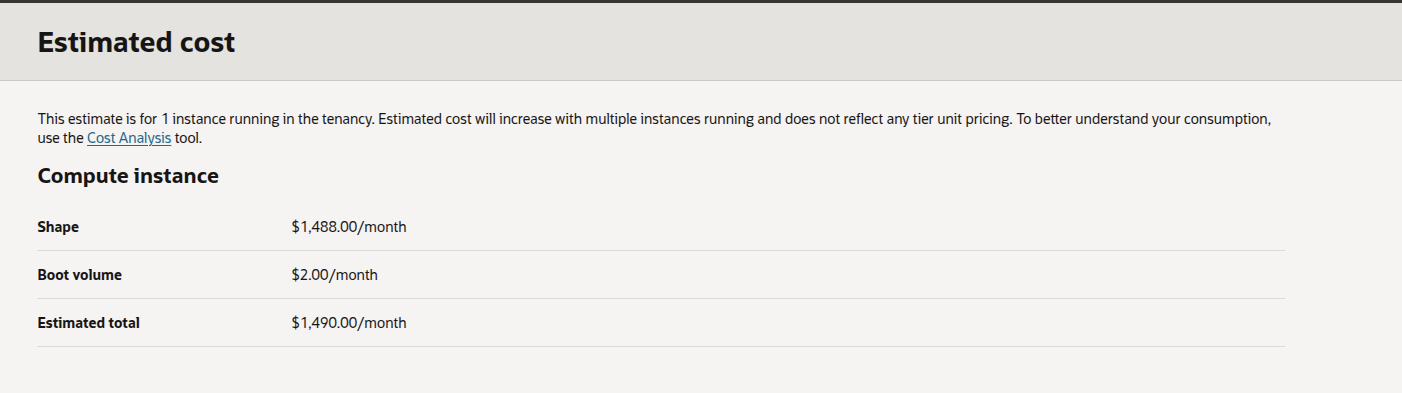
That number assumes 744 hours of continuous 24×7 uptime for an entire month — it's not what you owe the moment the instance boots. Cloud instances are billed on a per-second basis:
In other words, this 24 GB VRAM + 240 GB RAM machine actually costs $2.00 per hour of compute.
A typical distributed verification or benchmark experiment takes 1–2 hours, costing \$2.00 to \$4.00 total. Once your test finishes, hit Terminate in the console (checking the box to Permanently delete the attached boot volume), and billing stops immediately.
4. VM.GPU.A10.2: Going From a Single-GPU Quota to a Dual-GPU One
A single A10.1 is enough to verify rank mapping and cross-node addressing, but if what you actually need is real dual-GPU NCCL traffic on one node (not the CUDA_VISIBLE_DEVICES emulation from Option 1), you'll need the dual-card VM.GPU.A10.2 shape.
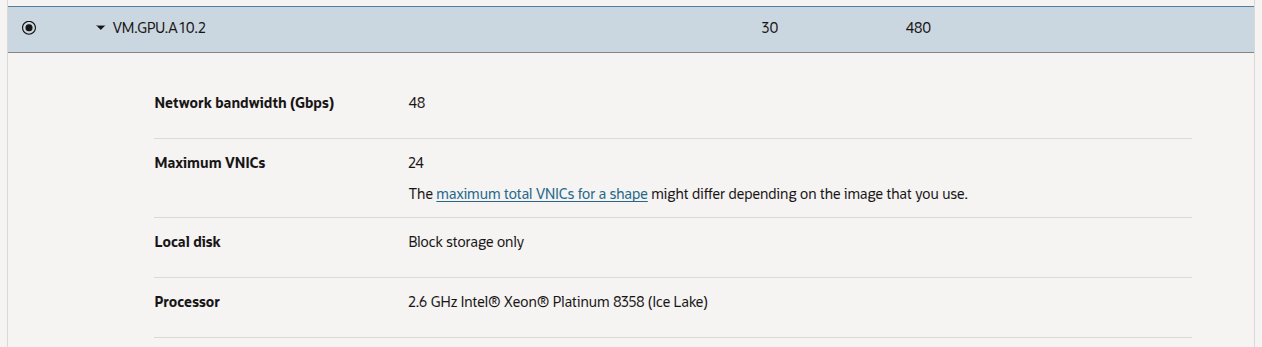
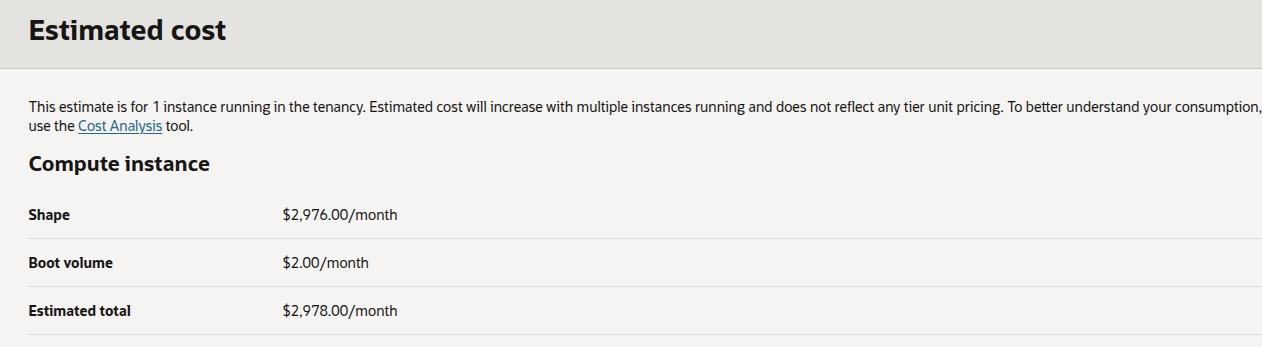
VM.GPU.A10.2 doubles all specifications (2 × A10 with 48 GB total VRAM, 30 OCPUs, 480 GB RAM, 48 Gbps network, at ~$4.00/hour):
However, if you select it while your approved limit is only 1 GPU, OCI immediately flags a red critical error:
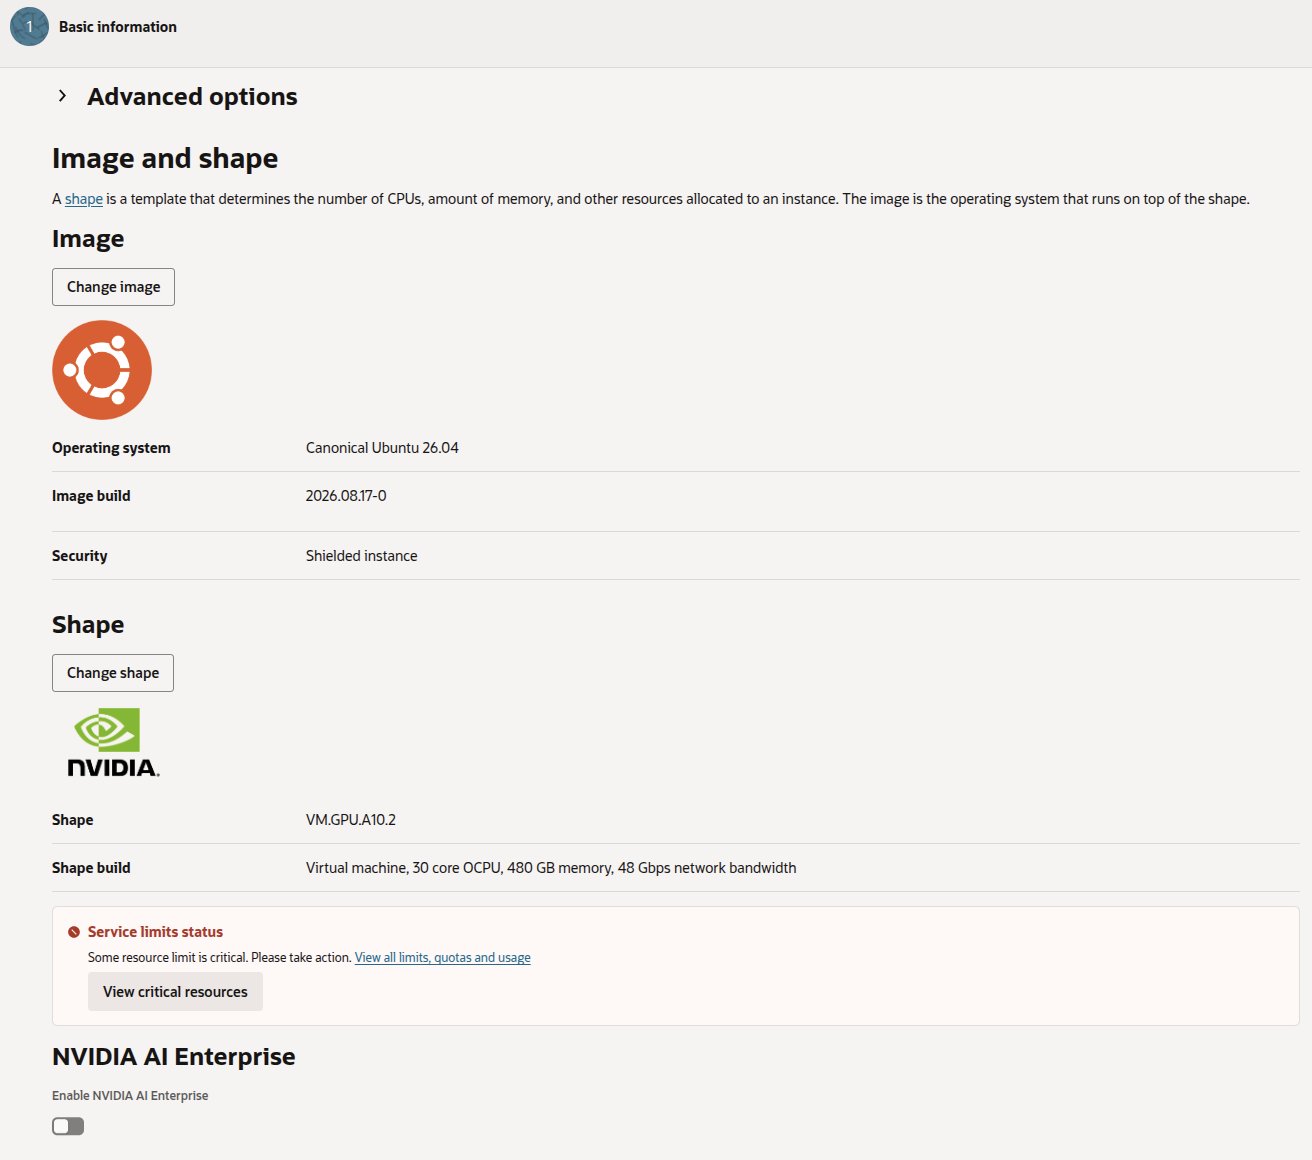
The reason is simple: VM.GPU.A10.2 requires 2 physical GPUs, exceeding your current limit of 1. On public clouds, "visible in the menu" does not mean "permitted to launch" — the quota is counted in GPUs, not in shapes.
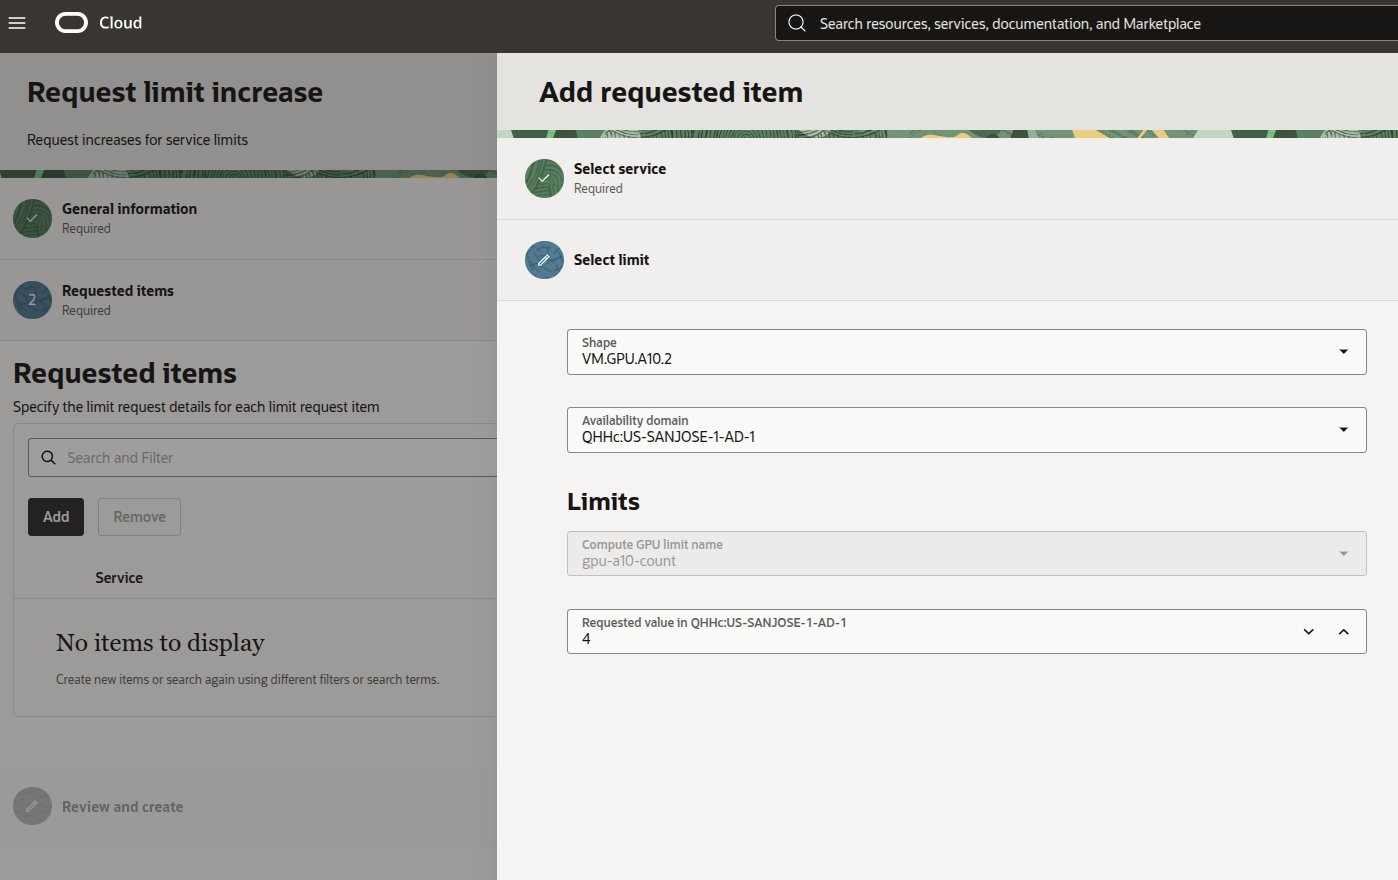
No need to change plans here — just go back to the Request Limit Increase screen and raise the requested value to 2 (enough for one A10.2) or 4 (enough to also run two A10.1 nodes for true multi-node testing):
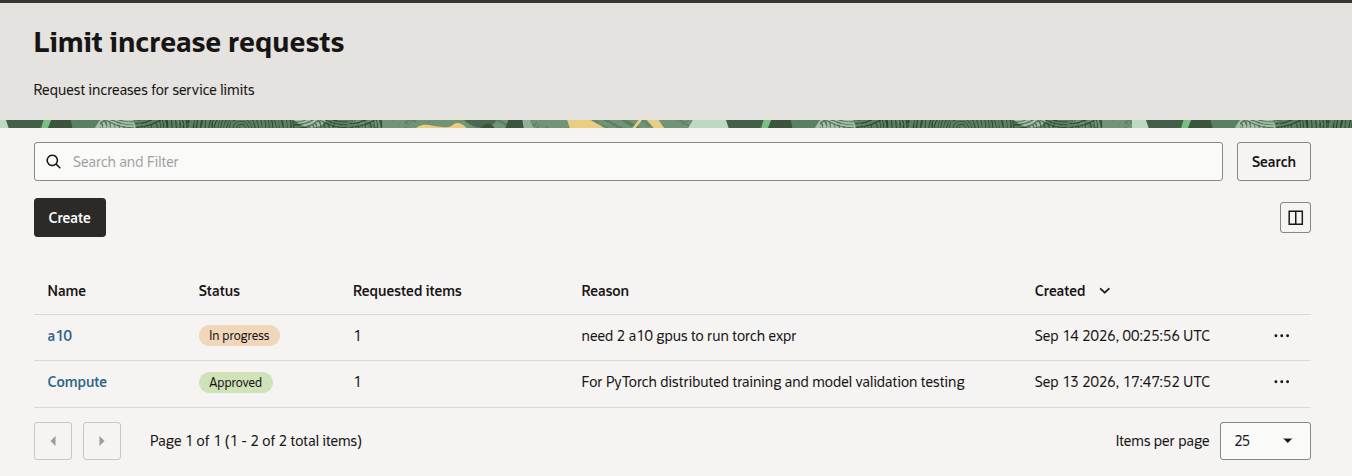
Once submitted, you can track the review progress in your requests list (the same Limit increase requests page as before — this time look at the a10 row, status In progress):
5. Operating System Selection and VCN Firewall Configuration
Two more details are worth knowing before you boot and wire up the nodes. Unlike the steps above, these aren't tied to a specific screenshot from this run — they're general OCI networking and Ubuntu-image knowledge, worth keeping in mind but not a substitute for whatever error message your own setup actually throws:
-
OS Selection: Ubuntu 24.04 LTS is usually the safer default
OCI consoles may present Canonical Ubuntu 26.04 or other bleeding-edge builds. For deep learning stacks (CUDA drivers, PyTorch, NCCL, vLLM, SGLang), the more mature Ubuntu 24.04 LTS tends to avoid driver and toolchain incompatibilities that show up on newer, less-tested releases. -
Opening VCN Subnet Ports and Flushing Guest iptables (a common hidden trap)
- VCN Security List: By default, only port 22 (SSH) is permitted. You'll generally need an Ingress Rule in your VCN's Default Security List: Source CIDR set to your VCN's actual range (e.g.
10.0.0.0/16), IP Protocol set to All Protocols, to permit inter-node communication. - Local OS Firewall: OCI's standard Ubuntu image often ships with
iptablesrules that drop non-SSH incoming traffic, even when the cloud security list is wide open. If cross-node communication is still failing after the security list is fixed, this is worth checking — log into each instance and run:
bash
     sudo iptables -P INPUT ACCEPT
     sudo iptables -P FORWARD ACCEPT
     sudo iptables -P OUTPUT ACCEPT
     sudo iptables -F
6. Executing Multi-Node DDP Training
Once your quota is raised to 2 GPUs, repeat the Section 3 flow to create two separate VM.GPU.A10.1 instances (not one A10.2). Place both in the same subnet of the same VCN — a new OCI account has only one VCN by default, so you satisfy this automatically as long as you don't hand-edit the network settings. With both instances running, each one's private address appears in the console under Instance Information → Primary VNIC → Private IP Address.
Assume Node 0 is at 10.0.0.10 and Node 1 at 10.0.0.20. First confirm internal connectivity with ping 10.0.0.20 from Node 0 — if it fails, revisit the Security List and iptables steps in Section 5. Then launch torchrun directly on each node, with no third-party VPN overlay:
# Node 0 (execute on 10.0.0.10)
torchrun --nnodes=2 --nproc_per_node=1 --node_rank=0 \
  --master_addr=10.0.0.10 --master_port=29500 \
  chapter3-distributed-training-with-pytorch-ddp/code/profile_ddp.py

# Node 1 (execute on 10.0.0.20)
torchrun --nnodes=2 --nproc_per_node=1 --node_rank=1 \
  --master_addr=10.0.0.10 --master_port=29500 \
  chapter3-distributed-training-with-pytorch-ddp/code/profile_ddp.py
Option 3: Already Have Local Hardware? Zero-Cost Practice on Local Workstations
If you already own physical GPUs (such as a lab workstation or your personal desktop), you do not need to spend even a few cents on Vast.ai. You can run these experiments locally for zero cost:
Scenario 1: You have a dual-GPU workstation (e.g., 2x RTX 3090 / 4090)
No cloud instances are required. Open two terminal sessions directly on your local machine, and reuse the exact CUDA_VISIBLE_DEVICES launch commands from Option 1:
- Terminal 1 sets
CUDA_VISIBLE_DEVICES=0; - Terminal 2 sets
CUDA_VISIBLE_DEVICES=1; - Zero cost, zero waiting, and instant local loopback communication. This is the ultimate daily debugging workflow.
Scenario 2: You only have a single GPU (e.g., 1x RTX 4090)
Many developers have a personal PC with a single 24GB RTX 4090. In this case, you have two elegant options:
-
Pure local multi-process logic verification:
When writing control flow (e.g., rank-0-only checkpointing and logging), use PyTorch's Gloo backend — the CPU backend — to simulate multiple ranks locally on a single machine, verifying non-communication code paths first. -
Geek Hybrid Multi-Node (Local + Cloud — untested, take as a sketch, not a verified recipe):
- Node 0: your local RTX 4090 as the Master node;
- Node 1: a single cloud GPU instance, linked to your local machine over a Mesh VPN like Tailscale;
- This path means tunneling across real public-internet NAT on both ends, which is harder to guarantee than Options 1 or 2 — and the cloud node should not be a Vast.ai instance: as noted in Option 1, Vast.ai containers generally lack the
/dev/net/tunkernel module, so Tailscale/WireGuard can't establish a tunnel there at all. A full VM provider like OCI (with real kernel-module access) is the sane choice for this node. Even then, whether the Tailscale tunnel holds up and whether NCCL's dynamic ports get through both networks' firewalls is something I have not personally verified — if you hit trouble, the VCN + iptables troubleshooting in Option 2 is a reasonable place to start.
Option 4: What If You Really Need a Real Slurm Cluster? Multi-Node Scheduling on Hyperscaler Clouds
Readers reaching Chapter 8 (Running Distributed Training with SLURM) often ask:
“The commands earlier in this article use interactive
torchrun. But production supercomputers and AI infrastructure submit batch jobs via Slurm (sbatch run.slurm). Can I simulate a multi-node Slurm cluster locally or on Vast.ai?”
The short answer: Simulating multi-node Slurm inside a single machine or Docker container is notoriously painful and counterproductive. If you truly need to practice multi-node Slurm scheduling, spinning up two VMs on AWS, GCP, or OCI is the only reliable path.
1. Why Simulating Multi-Node Slurm on One Machine Is Miserable
Slurm is not a standalone Python tool. It requires an entire stack of system-level daemons:
- Daemon Hierarchy:
munged(authentication with a shared secret key with strict0400permissions),slurmctld(central controller), andslurmd(per-node worker agent); - MultipleSlurmd on One Box: To emulate Node 0 and Node 1 on a single machine, you must configure separate network ports, spool directories, and CPU core affinity masks for multiple
slurmdprocesses inslurm.conf; - Container Limitations: Docker environments like Vast.ai lack
systemd(PID 1 is not init) and lack full cgroup v2 controller delegations. Attempting to run a multi-node Slurm stack inside them requires nested Docker-in-Docker and extensive sysadmin overhead.
2. The Three Non-Negotiables for a Real Slurm Cluster
A functional multi-node Slurm deployment requires infrastructure capabilities native to hyperscalers:
- Full Linux OS Privileges: Real virtual machines running standard systemd daemons and cgroup resource tracking.
- Private VPC with Mutual Hostname Resolution: Nodes communicate directly over internal IPs (
10.0.0.10and10.0.0.20, matching Option 2 above) on Slurm ports (6817/6818) without NAT traversal or VPN overlays. - A Shared Filesystem (NFS / EFS): Every node must see the identical absolute filesystem path. When you submit
sbatch run.slurmon Node 0, Node 1'sslurmdmust read the Python script and write output logs at the exact same path. Mounting an AWS EFS or exporting an NFS share from Node 0 solves this effortlessly.
3. Hyperscaler Turnkey Automation
Major cloud providers maintain production-grade open-source automation to deploy Slurm clusters without manual package installs:
| Cloud Provider | Official Slurm Orchestrator | Highlights |
|---|---|---|
| AWS | AWS ParallelCluster (Recommended) | Official open-source CLI. A short YAML configuration and pcluster create-cluster provisions HeadNodes, ComputeNodes, Slurm schedulers, NVIDIA drivers, and shared EFS/FSx storage automatically. |
| GCP | GCP HPC Toolkit / Slurm on GCP | Google's official Terraform blueprints deploy a production-ready Slurm cluster on Compute Engine in ~10 minutes. |
| OCI | OCI HPC Cluster Stack | Oracle's Resource Manager template provisions Slurm on OCI bare-metal and RoCE networks, popular for large-scale pretraining. |
4. The Budget-Friendly Testing Strategy: Validate on Cheap CPU VMs
Many engineers shy away from Slurm practice because multi-node GPU instances look expensive.
However: to validate the Slurm workflow, job submission, scontrol hostname parsing, and environment variable inheritance from Chapter 8, you do not need GPUs!
- Launch two CPU-only VMs on OCI's Always Free tier, e.g. two
VM.Standard.E2.1.Microinstances (1/8 OCPU + 1 GB RAM each, free forever) — the shape-selection screenshot in Section 3 already shows this shape tagged Always Free-eligible, and no GPU quota approval is needed. (If you'd rather use the Ampere A1 Flex allowance instead: Oracle quietly cut that free allowance from 4 OCPU/24GB total down to 2 OCPU/12GB total in June 2026, so two instances would only split down to about 1 OCPU/6GB each — and Oracle's own guidance is inconsistent on whether PAYG accounts are exempt, so check your account's actual current limit in the console before relying on it. A1 Flex is ARM64, but Slurm itself doesn't care about CPU architecture —slurm-wlminstalls from Ubuntu's arm64 repo the same way it does on x86, no extra gotchas from picking the ARM shape.) - Configure them as a 2-node Slurm cluster and submit
run.slurm. - Replace GPU tensor allocations with CPU dummy operations or a simple status print. Once your Slurm launcher, submission script, and shared storage paths are fully verified, swap the compute nodes to GPU instances (
g4dn.xlargeorg5.xlarge) for the final FSDP / Megatron training run.
One change you must not skip: a CPU-only instance has no GPU, so
init_process_group(backend="nccl")raises and exits during initialization — you never even reach the scheduling logic you came to validate. Switch the backend to Gloo (init_process_group(backend="gloo")), or write it asbackend = "nccl" if torch.cuda.is_available() else "gloo"so the same script moves between CPU validation and real GPU runs untouched.
The orchestration logic that actually matters in the job script — resolving the master node address dynamically, fanning work out across nodes with srun, and Slurm's automatic injection of SLURM_PROCID, SLURM_LOCALID, and SLURM_NNODES:
# The single most important line in a Slurm job script: resolve the master address
MASTER_ADDR=$(scontrol show hostnames \
  "$SLURM_JOB_NODELIST" | head -n 1)
This scheduling logic behaves identically on two permanently free CPU micro-instances and on a multimillion-dollar H100 supercomputer cluster.
Closing
Mastering distributed AI systems is about building intuition for network topology and resource mapping, not memorizing API names.
You do not need a multimillion-dollar compute allocation or an institutional cluster to get started. For the price of a cup of coffee or a fast-food lunch, you can spin up cloud VMs, or use CUDA_VISIBLE_DEVICES on a single dual-GPU box to emulate two virtual nodes. Running multi-node rendezvous, device placement, and collective communication with your own hands will make the architectural diagrams in the book come alive. What actually takes time in real engineering is rarely the training code itself — it is the platform friction: quota approvals, daemons, and kernel configurations. That platform friction is an essential part of distributed engineering capability, and deserves to be mastered alongside the algorithms.
Feel free to write to me at xuanxinjishu@gmail.com, or connect on LinkedIn and tell me what pitfalls you ran into.
Github: https://github.com/PacktPublishing/Distributed-AI-Systems
Amazon Purchase Link: https://www.amazon.com/dp/1807301710/
Book Support Website: https://distaisys.com/
Mocksphere Book Exercies: https://www.mocksphere.com/categories/Distributed%2520AI%2520Systems/
Distributed AI Material Sharing Group: https://www.mocksphere.com/creator/groups/9/files/